KaylinaNorton.com

View my portfolio and set up your session.

How to Prep for Your Couple Session

5 easy tips to get the most from your couple session.

What to wear for Senior Portraits

A few tips and styles you should look out for.

How to Get the Most Out of Your Wedding Photographer

Make your pictures as painless as possible.

Package Prices

Check out prices and set up a session tailored to you.

Showing posts with label tips. Show all posts

Wednesday, March 11

Planning Our Wedding: Registering for Gifts

wedding registry tips

As I grow up I quickly learn that more and more things are not what they seem like in the movies. Do you know how many movies I've seen brides-to-be joyously walking through an immaculate home goods store carefully picking out their fine china, good crystal, and spotless silverware to be added to their wedding registry? I don't have an exact number, but I do have a ballpark - too many. And let me tell you something - that is not how it really is.

All of the wedding websites suggest you register at stores that will gives guests a variety of choices in both products and budgets, so when it came time to register for our wedding, Blake and I chose to register at 3 stores: Sur La Table, Target, and Crate and Barrel. And similar to a romantic comedy, I learned a lesson at each one until it was just right.

Lesson Number 1: Make an Appointment
We registered at Sur La Table on a whim one night. We were already at our local mall and had about an hour to kill and I decided that the best use of that hour was registering for wedding gifts. So with no preparation or forethought I walked in to the store and announced that we would be making a wedding registry. We quickly learned two things - Blake and I do not have the same style when it comes to anything related to kitchen ware and neither of us had enough cooking or baking knowledge to even be in that store in the first place. That's where an appointment would have come in handy. Sur La Table offers appointments for gift registries so that they can have a staff member ready to answer all of your questions - even the silly ones. The store and its products are amazing, so please take advantage of their offer to set up an appointment so you can get the full experience and be confident in your decisions instead of wondering out loud the difference between a cookie sheet and a jelly roll pan.

Lesson Number 2: Be Ready to get Weird Looks
Taking a cue from lesson number one, we registered at Target on a week night when we knew that store wasn't going to be too busy. At Target they have you do your registry entirely on your phone - you download their registry app and use your phone's camera to take a picture of the product's barcode and you're done! Simple as that. But unfortunately without an official looking scanner, you just look like a crazy lady wandering the aisles of Target taking pictures of everything. It was only when I turned around to find a little girl staring at me with a look I can only describe as equal parts terror and concern in the bedding aisle, that I realized Blake had wandered off and I was having a conversation with myself about the merits of down alternative pillows.

Lesson Number 3: Go to the Pros
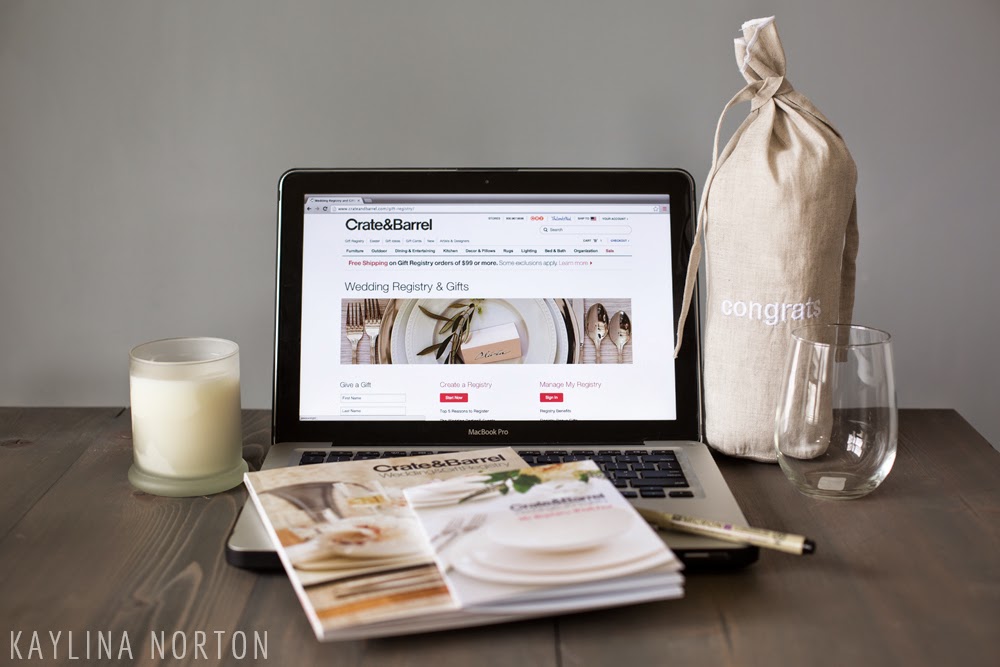
There's a reason that everybody and their mother has registered at Crate and Barrel for their weddings. Not only are their products stylish and extremely durable, they know what they're doing. My local Crate and Barrel hosted a wedding registry event on a Sunday morning where they allowed engaged couples to come in before the store opened and register. They had a plethora of sales staff ready and willing to answer questions, give demonstrations, and help in any other way they could think of. When we entered we were handed a list of commonly registered items sorted by type and use and I could have kissed them. You know how I feel about beautifully arranged lists. The pros at Crate and Barrel let Blake cut things with insanely sharp knives, let me arrange a pretend dinner party with the cups, plates, and silverware of my choosing, and even gave us a gift on the way out the door! Crate and Barrel by far was the closest to the Hollywood registering experience I had imagined.

Keep smiling!

Kaylina

Monday, February 9

7 Easy Things Brides Should Do for Better Wedding Photos

I'm going to be really honest here - I've been wanting to write this blog for a long time. As a photographer, I am always trying to help my brides get the best pictures possible and over the past five years I've collected a short list of the easiest things brides can do for instantaneously better wedding pictures. These items range from something more abstract (like having a conversation with your photographer) to very tangible (bring your invitation suite!) but they're all things that should take less than 20 minutes of your time and will have you thanking yourself for years to come.

1. Walk Your Photographer Through Your Day
I love to meet with my brides about 6 weeks before the wedding to talk about timelines. I know six weeks sounds a little early, but it's never too early to nail down the backbone of your wedding day. In addition to talking wedding day timelines at this meeting, I like to ask more about the wedding itself. Specifically I want to know if there is anything they have planned for their wedding that is truly unique and personal to them. If you have a surprise planned for your groom/parents/bridal party tell your photographer so they have their camera ready to capture the reactions instead of being surprised right along side of everyone else. Talk about specific decorations. If you've incorporated vintage books into your centerpieces your photographer will definitely take pictures of the decor as a whole, but if they don't know that the titles of the books themselves are important to you, they might not include those in the pictures. So make sure to point out anything and everything that's important to you. As photographers our goal is to capture your special day in a way that you're going to cherish forever. So don't hesitate! Over-sharing is still caring!

2. Think About Where You're Getting Ready
A lot of Brides don't put a lot or any effort into where they're getting their hair or make-up done and it's really a missed opportunity. When planning where you'll be getting ready make sure to consider the following things: 1) natural light - not only will the pictures be significantly better, but this will help your make-up artist out as well 2) space - make sure it's not going to be a cramped area for you, your bridesmaids, moms, hair dressers, make-up artists, or anyone else you'll have hanging out with you while you get ready 3) Wherever you go, keep it tidy - nothing ruins the effect of the first photo of you in your dress like noticing a bra hanging out of a duffle bag in the corner of the photo. Getting ready in hotel rooms or salons are normally safe bets as long as they have plenty of windows. And don't forget to apply these rules to the guys as well!

better wedding pictures tips

3. Organize a Details Bag for your Groom
Now that we've talked about where you're getting ready, let's shift our attention to the guys. While I'm with the girls, snapping pictures of hugs and happy tears, the guys are normally somewhere else awkwardly sitting around, drinking, and watching TV. Since there's not as much going on with the guys, it's a great opportunity for, Blake, my fiance/second shooter to take some male detail shots. So prepare a bag of small things that your groom will be carrying around with him on your special day and have him give it to the photographer when he arrives. This does two things: 1) it rounds out your wedding pictures as a collection for your album or prints - now you'll have some more masculine pictures to compliment the bride's detail photos 2) it helps the guys get acclimated to the photographer in the room - it might sound silly but guys generally have a harder time warming up to the camera so if Blake spends the first 20 minutes taking pictures of things, instead of them, we can all avoid 20 minutes of fake smiles and stiff bodies. To help you brainstorm, here's what we love to take pictures of: shoes, socks, cuff links, tie, flask, belt, watch, handkerchiefs, and cologne.

4. Bring Your Invitation Suite
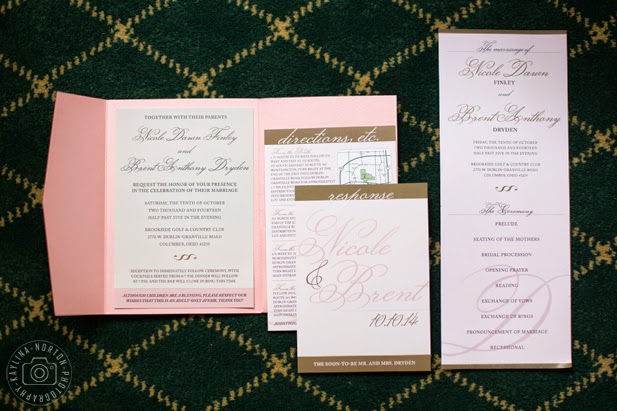
Most brides know that their photographer is going to want to take detail photos of their shoes, jewelry, dress, perfume, flowers, etc. but a lot of brides forget to bring a copy of their invitation suite. This means everything: the save-the-date, the invitation, the RSVP card, any other inserts you included (directions, registry information, etc.) and the envelopes! It's a good idea to create your own bag of bridal details for your photographer and stick the invitation suite in there as well. You spent a lot of time and money on your invitations so you deserve to get a great picture of the finished product. Not to mention, if you're interested in having your wedding in a publication/blog afterwards, the invitation suite shot is a must have!


5. Ask your Officiant to Step Aside
This might sound a little rude, but in your last meeting with your officiant before the wedding (ideally at your dress rehearsal) ask if he or she wouldn't mind stepping aside after they pronounce you "man and wife". When the time comes for the first kiss you will always find me at the end of the aisle. I want to get the best, straight on shot of the first kiss I can and then be ready for the recessional. So if I'm at the end of the aisle and your officiant is still standing in the middle behind your and your now husband, his or her head and body can be a little distracting in the photo - you might end up with the top of a bald head sticking out above you guys or an extra set of legs down below that appear to come from nowhere. I'm not asking that they dive off the stage after they say the magic words, but just a single step to the left or right will normally stop the phenomenon of extra limbs popping out of you.

6. Don't Forget About Reception Details
Generally, the bulk of your wedding budget is going toward the reception. Food, drinks, music, and decorations add up very quickly. So don't forget to give your photographer some time (at least 20 minutes) to photo the reception in detail before any guests have access to it. You'll want to document what the room looked like before your guests have rearranged their place settings, thrown their coats over chairs, and left their bags in the corners. I realize that sometimes this is difficult, especially if your ceremony isn't at the same location as the reception, but talk to your photographer, the venue, and wedding coordinator and see if there's a way to keep the guests in a separate location for cocktail hour or some other creative way to sneak your photographer in for a few photos ahead of the guests.

better wedding pictures tips

7. Take Time for a Sunset Shoot
While first looks are gaining popularity, a lot of couples still prefer to not see each other until the ceremony. Regardless of your feelings about a first look, you should without a doubt take time during your reception for a sunset shoot. I ask all my couples if they'd be up for sneaking outside for 15 minutes during their reception, about 30 minutes before sunset. The pictures that I get to capture during a couple's sunset session are seriously indescribable and priceless for two reasons: 1) the lighting during this time is absolutely gorgeous - there's a reason photographers call it "the golden hour" 2) the bride and groom are generally in party mode at this time - they've already eaten, the groom generally has a few drinks in him, and all the things that might have been making them anxious or stiff in earlier pictures are over; now it's just time to party. And bonus: it gives the couple a few minutes to be by themselves and soak everything in. All of these factors combine into great, intimate pictures that really can't be captured any other time in the day.

better wedding pictures tips

So that's it - 7 easy things you can do to help your wedding pictures WOW you for the rest of your life! 
Married couples - did I miss a tip that you did on your big day that paid off in your pictures? Leave them in the comments below!

Keep smiling!

Kaylina

Wednesday, January 21

Planning Our Wedding: Shopping for Engagement Outfits

I think the most common question I get from brides after we've scheduled their engagement session is: What do I wear? That is a pretty difficult question for me on a day to day basis, let alone when I'm considering what to wear in photos that I'll cherish forever. Talk about pressure. So when it was my turn to have my engagement pictures taken, I used all the advice I normally give my clients and went shopping!

Before I really get going, the pictures you see in this post were not taken by me because I'm in them (I'm not that good). Instead, they were taken by the amazingly talented Angela Fortin.

1. Have a general idea of what you're looking for before you go shopping (and know what you already own)


Before you open the doors to your local mall I would have a game plan of what you're looking for. I generally tell my clients to have 2-3 outfits ready for their session. That way they'll have some variety between pictures but also have enough time in each outfit to get some good pictures. I also suggest that the outfits should be a mix of dressy and casual.

Blake and I knew that we only wanted to do two outfits - one dressy, one casual. We weren't going to buy a new suit for Blake so we already knew that he'd be wearing navy, which meant I just needed to find a dress that would go with his suit. The casual outfit was a little more up in the air but we knew that we'd probably only need new shirts for this outfit since we could wear pants and shoes we already owned. So at this stage we were looking for a new dress shirt and tie for Blake's dressy outfit, a dress and necklace for my dressy outfit, a shirt for both of us for our casual outfits.

2. Start timeless


I always tell my clients to stay away from giant logos, crazy patterns, or anything that's super trendy at the moment. You're going to have these pictures for a long time and you don't want to look back at your pictures like an episode of "Friends" and go "what were they wearing!?!" - try to stick to solid colors, classic patterns (stripes, polka dots, plaid), and timeless silhouettes. 

When Blake and I were looking for our casual outfit, I found a solid burgundy t-shirt and Blake found a nice blue and white striped t-shirt. The building blocks to your outfits should be timeless.

3. But don't be afraid to go big


This is going to sound like it's in direct contradiction of the last tip, but it's not. Find a good balance of classic staples with trendy accessories. I don't want my couples showing up to sessions in plain, frumpy, nondescript clothes that don't show off their personality at all. So if you find something that makes your heart stop - buy it!

After I bought the solid burgundy tee, a ridiculously large floppy hat also caught my eye. So I bought it. I am fully aware that the hat might look silly in 10 years (if it doesn't already) but I wanted it in a few pictures and took it off for the rest. Blake's dress shirt that he ended up finding was chambray. Chambray is very in right now, but it might not be in the future. That's okay, because the solid navy suit he was wearing should stand the test of time. Like I said, find a balance.

4. Never be afraid of accessories


Accessories are exactly what Emeril was always looking for to take something up a notch. Throw in some amazing accessories and BAM!! Your engagement session just made your photographer swoon. I always tell my brides to bring heels to their sessions if they are heel wearers at all. They don't have to wear them for every outfit, but having heels in just a few pictures will be magical. At the risk of sounding like the man from Men's Warehouse - You're going to like the way you look; I guarantee it. 

That being said, I want to acknowledge that I did not follow my own rule for this - I am vertically blessed as a girl and Blake is my height (or an inch taller if you believe him) so I don't wear heels around him. But if you and your partner are a good mix of heights and heels work for you, please bring them to your session! Since I couldn't accessorize with woman's real best friend, I bought a super cute necklace from J. Crew for my dressy outfit and the hat I mentioned before for the casual outfit. They were the perfect small things to make the outfits pop.

5. Be comfortable in what you're wearing


This tip needs to happen on two levels. You need to feel physically comfortable in what you're wearing. Make sure it fits correctly and makes you feel good about yourself and your body. But you should also feel comfortable with what you're wearing in a personal sense. Is that an outfit that feels like you? Is it something that you might normally wear or your ideal you would wear? It's okay to dress a little nicer for an engagement session than you normally do, but the outfits should still reflect your style.

When shopping Blake and I went to our local outlet mall to get some great deals on some bigger brands we normally only dream about wearing. And we found some great bargains and were able to curate outfits that felt like us or at least the us we wished we could afford to be. Except for one thing - I found a pair of shorts that fit me fine and that I felt I looked good in, but after taking them home and trying them on with the rest of the outfit it just didn't feel like "me". So I returned them and wore a pair of shorts I already owned.

If anyone has any other great tips for what to look for when shopping for engagement sessions please leave them in the comments below! If you're looking for outfit inspiration check out my Pinterest board or check out the engagements gallery on my website! I love the effortless yet fashionable styles my clients always bring to their sessions.

Keep smiling!
Kaylina

Wednesday, January 14

Using Pinterest as a Professional Photographer


Hello, my name is Kaylina and I'm a recovering Pinterest Addict. When I first discovered Pinterest I was in college and spent most of my part time job as an office assistant on the site pinning crafts I would never complete, recipes I would never attempt, and decorations for a house I would never own. Pinterest is kind of known for that I think - aspirations of a picture perfect life most of us will never have, but it's always fun to dream. I will say though that I've found three very useful purposes for Pinterest as a photographer.

1. I use Pinterest to get a feel for my brides on a personal level 

When I first meet with a couple I ask if they're on Pinterest and, if they are, to send me a follow request because I find that I can learn so much about a person from their Pinterest boards. Not only can I get a sneak peek at their wedding from any wedding boards a bride might have, I normally can get a good understanding of their sense of humor, if they're animal lovers, book worms, movie fans, or fashion forward. Now obviously, I'm making a lot of assumptions by doing this (if you looked at my profile you'd think I like to cook. I actually like to eat. I have no idea how to cook), but it gives me a rough idea of who the bride is as a person and allows me to interact with them on another level before the big day.

2. I use Pinterest to guage my brides' photography style

If a bride doesn't already have a wedding and engagement photography board, I ask her to make one. And no, it is NOT because I want to copy all the pictures she pins. I ask a bride to make a photography board so I can see what kind of pictures she is drawn to and what kind of pictures she would like to get out of the experience. I might notice that a bride has posted a lot of super snuggly, flirty pictures so I know to plan for a fun, candid session. If I notice that a bride pins more editorial, high fashion images I'll plan for more serious, intimate poses. Sometime brides will post 5 or 6 different pictures of the same pose so that obviously lets me know that we should at least try out that pose or something similar.

3. I use Pinterest to give some last minute tips to my brides

I normally check out my brides' boards about 2 weeks before a session to gauge their style and give out any last minute tips. If I notice that the bride has posted a lot of pictures of girls in heels, I'll suggest they bring heels to the session, even if just for one outfit. You'd be surprised how much high heels can change a picture. If they've posted a lot of pictures with props (blankets, baskets, balloons, etc.) I'll check in and see if they're planning on bringing anything with them to their engagement shoot. I also check in to make sure the pictures she's been pinning are realistic. If she's the same bride that posted a bunch of snuggly, flirty pictures but her man is adamantly against PDA, we're going to run in to a problem. 

Again, the idea is not to copy any of the pictures from Pinterest - I've just found it to be a helpful tool to make sure that both myself and the bride are on the same page going in to an engagement shoot or wedding. Knowing a bride's style and expectations before hand makes the experience more enjoyable for everyone. And getting another person addicted to Pinterest is always a bonus.

If you'd like to check out my style or make assumptions about my personality, you can look at my Pinterest boards here.

Keep smiling!
Kaylina

Thursday, July 24

How to Use a PASS Gallery

I've been using PASS galleries to deliver my clients' images to them for a little over a year now. I love the galleries so much, I even wrote a post about it. One of the things I love about PASS is how easy it is to use and all the cool things it can do. But I understand that not all my clients (or clients' family members) would describe themselves as "tech-savvy" so I decided to make a tutorial on here for anyone who is using PASS and would like to know more about it.

I'm warning everyone now, this is a long tutorial because I tried to be very thorough. If you're here looking for something specific feel free to skip down to the number that interests you:

1. Welcome to Pass
2. Download the app
3. The Navigation Menu
4. Viewing, Favoriting, and Ordering Images
5. Sharing Images
6. Quickly Adding Favorites and Prints
7. Sharing Your Favorites and Checking Out
8. Downloading Images
9. The PASS App

1. Welcome to PASS


When you open a PASS gallery on your computer, phone, or tablet, you'll be greeted with a welcome image, slideshow, or video. I currently use slideshows, but who knows what the future will bring! The slideshow advances by itself, no need to click the next image. When you're done watching the slideshow, simply scroll down to see the images in the gallery. If, at any time, you want to share the link to your gallery you'll find it in the address bar at the top.

2. Download the app


After scrolling down into the actual gallery, a small box will pop up in the lower right hand corner asking you to download the PASS app. If you are on a phone or tablet I HIGHLY recommend downloading the app. I'll explain all the perks later in the tutorial, but you'll definitely want to download it if you plan on coming back to the gallery more than once. If you're on a computer, just hit the "X" to close the box and move on.

When you first open a PASS gallery, the first group of pictures you see are my favorite images from the event. I always split weddings up into different collections so you and your guests can navigate more easily. To switch collections, click on the three lines in the top left corner.

3. The Navigation Menu


After expanding the left menu by clicking the three lines in the top left corner, you'll see several options. To switch between collections, simply click on the name of the collection you'd like to see. In this example you see there are six collections- Kaylina's Favorite, Rehearsal, Before Ceremony, Ceremony, Group Pictures, and Reception.

You also have the ability to login, download photos, view any favorites you may have, view your print cart, and sign the guestbook - we'll talk about all of these options later in the tutorial.

For now, we'll take a look at how you can interact with individual images. If you click on any picture once, it will magnify.

4. Viewing, Favoriting, and Ordering Images


Clicking on an image once in the gallery view will bring up this screen, with a magnified view of the image. To share, favorite, or order the image, click the plus sign in the top right corner.


If you click on the heart or "my favorites" the image will be added to your "favorites" collection. You'll be able to view that collection at any time in the navigation menu on the left side of the screen we talked about above. We'll talk more about all the cool things you can do with your favorites later, but for now just know that clicking that heart is the easiest way to flag the images you love.

If you click on the shopping cart or "prints" the following screen will pop up...


This window allows you or your guests to order professional quality common print sizes for great prices straight from PASS. If you're looking for different sizes, canvas, albums, or anything else- don't hesitate to contact me directly and I can get those for you as well! To add an order to your cart simply hit the plus sign by the size that you want and click "keep shopping" to go back to the image!

5. Sharing Images


One of the things I love about PASS is how easy it makes it to share images digitally. On the right hand tool bar, you'll see the Facebook, Twitter, Pinterest, and Email symbols. Simply click on your preferred method of sharing and PASS will guide you through the rest!


You'll also notice in this screen that a small banner has appeared in the top left corner of the image. This banner shows with a heart that the image has been favorited and the cart means the image is also in my cart.

When you're done looking at a picture just click the arrow in the top left corner of the screen (not the back button of your browser) to return to the gallery view!

6. Quickly Adding Favorites and Prints


Once in the gallery view, you'll see the small white banner in the upper right hand corner of any images you've favorited or added to your cart. If you'd like to add an image to your favorites or to your cart without clicking on them just hover over the bottom right corner with your mouse and two black icons will appear. Just click on the heart to favorite a picture and the shopping cart to add it to your cart!

Click on the three lines in the top left corner at any time to view your favorites or your cart!


7. Sharing Your Favorites and Checking Out


Clicking on "My Favorites" on the left navigation menu will bring you to the above screen. From here you can view all the images you've favorited and easily share all of them at once by clicking the button at the top that says "Share to Facebook".


Clicking on "My Cart" on the left navigation menu will bring you to the above screen. From here you can checkout by clicking the button at the top of the page. You'll have to sign in to check out so PASS knows where to send the receipt, but the login process is very self-explanatory. You can choose to use your email or Facebook information to sign-in and you'll be on your way!

8. Downloading Images


When you're ready to download your images, select "Download Photos" from the left navigation menu. For security and copyright reasons, only brides will be able to download images from a PASS gallery, although anyone can purchase a print from a gallery.


After clicking the "Download Photos" and signing in, you'll see the above window pop up. Here, you'll be able to choose which collections you'd like to download by clicking the "x" beside each collection. You'll also be able to only download your favorites if you'd like. There's no need to download the intro collection you saw when you first opened the gallery- those are just my favorite images from the wedding but they're also in the other galleries so they're just repeats.


After choosing which collections you'd like to download you'll see a message letting you know that your downloads are being prepared. PASS will email you a link to the photos when they're ready so you can close the window and come back later.


When you receive the email click the download button and you'll be taken to a window that shows you all of the files ready to be downloaded. Because the files are so large, PASS zips the files together to be more easily downloaded. Simply click the "download" button below each zip file. The files will appear in your downloads folder. Just unzip the files and enjoy!

9. The PASS App

The PASS App looks very similar to the computer version and works pretty much the same as well. The best feature about the PASS app is that you can sync the photos to your phone and tablet and show them off no matter where you are. Check out the screen shots below to see how to make your photos available offline.


I hope this tutorial helps at least one person out there that isn't exactly "tech savvy". Please don't hesitate to reach out on here, on Facebook, or by email if you have any questions!

Keep smiling!
Kaylina

Sunday, March 30

Creating a Wedding Timeline

A few days ago I had a bride contact me about her wedding timeline and I knew I had met my soul bride. She had everything planned down to the minute, categorized by who was in charge of the event, and ordered by what part of the wedding it fell in to. I don't know if I've mentioned it, but I'm a spread sheet kind of girl, but I understand not everyone is. I also understand that wedding timelines are something a lot of brides struggle with so I thought I'd offer my humble advice on the subject.

I like to start with the basics and work backwards. So put down the basics...

5:00pm Ceremony
7:00pm Food is served
10:00pm Reception ends

From there I would figure out your priorities, and as a wedding photographer, photography is mine so I would figure out how many hours of coverage I have with the photographer and add that in. I currently offer 10 hours of coverage in my package so let's use that. Working backwards from the 10pm reception ending time, I would begin at Noon.

12:00pm Photography coverage starts


A lot of brides want me there for the hair and make-up so they would talk to their stylists and see how long they expect the appointments to take. If they need to start earlier than noon to fit the entire bridal party in, then I tell the bride to go last and start her appointment at noon.

12:00pm Photography coverage starts, Bride's hair and make-up appointment

This is where people start to think they have more time than they do. They look at the 5 hour gap between the Bride's hair and make-up and the ceremony and they think they should shorten it. Don't. Let me show you just on the photography side what we'll be doing for the rest of the day...


creating a wedding timeline


For those of you saying, "I'm not going to do a first look or a hidden session so I don't need all that time" please don't shorten the timeline for that. If the bride and groom are not planning on seeing each other before the wedding then that means that those bridal party photos at 4 will be broken up into just the bride with her girls and the groom with his guys. This translates to me running between the two groups, which is not a problem, but it takes time. So I would start girls group pictures at 3:30pm and guys at 4:00pm.

Keep in mind that not having a first look means that we will need to do the combined bridal party shots during the family pictures time (add 10 minutes to that slot) and the small 15 minute portrait session after the ceremony for the bride and groom will also need to be extended to at least 30 minutes. Meaning that you either need to serve food later or you lose out on reception details. What normally ends up happening though, is the bride and groom feel so pressured to feed their hungry guests that they cut their portrait session down to 5 minutes and end up with almost no pictures of just them. Which is the worst thing I can think of.

This schedule also makes the assumption that the ceremony, cocktail hour, reception, and photography opportunities are in the same location (or within walking distance). If that is not the case, please plan accordingly. Also keep in mind that while your venues might be gorgeous and you want to take pictures there, there will be guests milling around about a half hour before the ceremony begins and after so photo opportunities at the venue might not exist. You should scout out a few locations within walking distance or a 5 minute car ride that can serve as great photo-ops for the bridal party and bride and groom's pictures after the ceremony.

Hopefully this outline of a wedding day will help you pin down your schedule and give you some peace of mind. As a said, schedules are intimidating, I even used an outline from one of my favorite photographers, Jasmine Star, and tweaked it for the clients that I normally see. So feel free to steal this one or change it to fit your needs!

Keep smiling!
Kaylina


Sunday, February 23

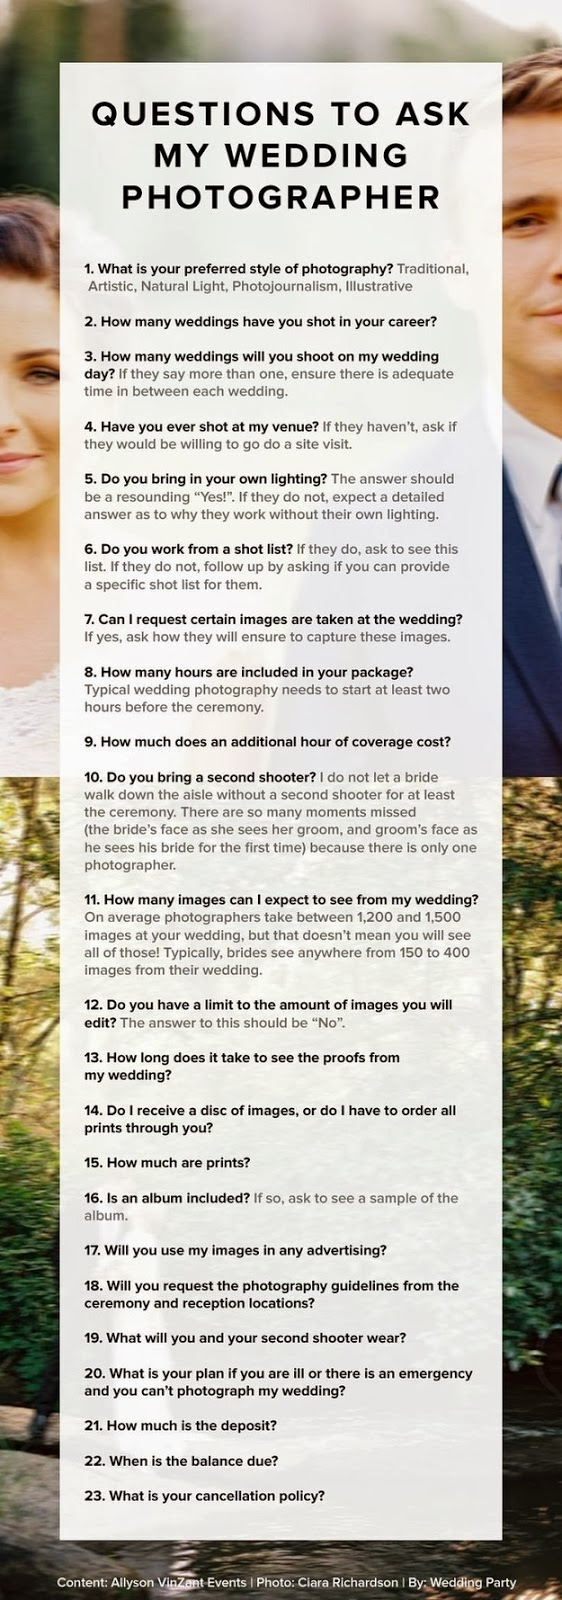
The Real Questions to Ask your Wedding Photographer

If you've read my blog before, you might have noticed something: I'm a big fan of Pinterest. If you check my Pinterest page you'll see that it might border on "addiction". I have not one, but four boards, dedicated to weddings. Everything from wedding photography that inspires me, to decor ideas, to info graphics on how to properly plan a wedding.

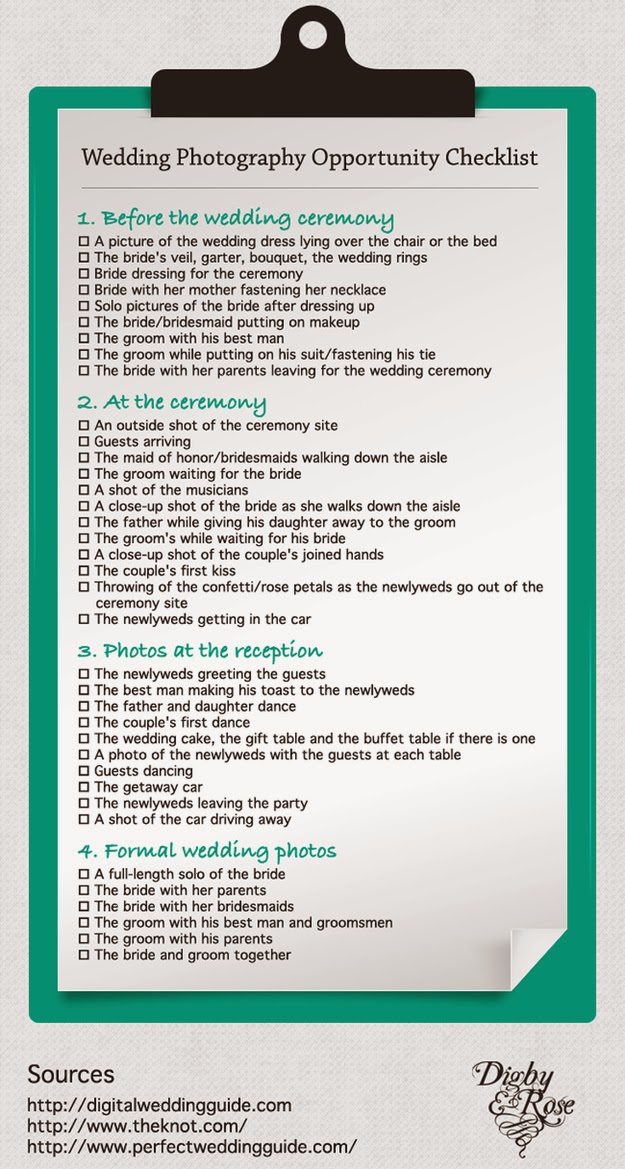
The other day I found a pin linking to a Buzzfeed article titled "These Diagrams are Everything You Need to Plan Your Wedding". While I found most of the info graphics interesting and helpful, I had to laugh when I got about halfway down the list and found two related to choosing your wedding photographer. You can see them below.

 questions to ask wedding photographer

questions to ask wedding photographer


I think it is important to get an answer to the questions mentioned above and to have an idea of what sort of photos the photographer will be capturing throughout the day. But what scares me about these graphics is that I get an overwhelming feeling that the relationship between the bride and the photographer is nothing more than a business transaction.

My "meetings" with clients are not business meetings, they're get togethers that allow me a chance to get to know the couple, their style, and how I can best serve them. I want to establish a friendship with my clients so that my services are less about an exchange of goods and more about capturing the love and emotion of their special day in a way they can cherish forever. 

I have no problems talking about how many weddings I've done, the kind of camera and lighting I use, or how many pictures the bride will receive after the wedding, but what I really want to establish in our first meeting is that the couple and myself are a good fit. That we'll get along. Because a wedding can be a little awkward when you have a complete stranger with a camera following you all day instead of someone you trust and shares common interests with you. 

So I would encourage any bride out there looking for a wedding photographer to not only get the answers to these questions, but to dig a little deeper. Are you a huge Netflix person? Then find out what the photographer likes to watch on TV. Love animals? Does your photographer have any pets? Yes, these answers might have nothing to do with their skills as a wedding photographer, but it will make the day more enjoyable as this person spends hours with you and your closets friends and family.

And please, if you don't trust your photographer enough to capture "the couple's first kiss" without having writing it on a list, find another photographer.

Keep smiling!
Kaylina

Thursday, January 23

Photos for the future

example of a wedding photography fad


I have to admit, I have a love-hate relationship with Instagram. Personally, I love using it as a way to connect with my friends and family visually, seeing what they're up to without long winded statuses or game invites. As a photographer, I hate it. Not because it has inspired everyone and their mother to become fledgling food photographers, but because it has made filters the new "it" fad.

Over the years of meeting with brides and talking about wedding photography, our conversations always seem to touch on one topic: style. I'm not talking clothes or interior design, but editing style. Currently there's a lot of styles out there in the wedding photography industry. And I don't want to talk badly about anyone else's style because I understand that personal preferences are just that- personal, but I do want to take a minute to talk about my editing style and why I haven't started using filters.

I believe that wedding pictures are priceless. 50 years later, they'll be dragged out, and dusted off to bring smiles to the faces of those that were there and those that weren't even born yet. My parents recently celebrated their 31st wedding anniversary and I found myself pouring through their wedding album one night sitting indian style on the floor. Their pictures were simple and what I like to call "classic". They hadn't been overly processed (maybe because that wasn't possible in the early 80s), they were just real.

That's the style that I try to achieve with every wedding I edit. I edit all of my pictures very minimally with 50 years down the road in mind. I correct lighting and colors when necessary, but try not to mess with much else. I don't bump up the vibrance, or decrease the contrast, and I never apply filters. Because, I believe, in 50 years pictures that haven't been edited as much are going to stand the test of time and those with filters will look like a fad that coming generations just won't understand (much like the concept of lacquering a composite photo to a tree stump is a foreign concept to us now).

So I leave the filters to my Instagram feed, because my pictures of my cats and my Panera lunches don't need to stand the test of time. They're just for fun, for now.

Keep smiling!
Kaylina

Friday, April 5

Making Time for Pictures on Your Wedding Day


This might seem silly and obvious, but this post is about making time for pictures on your wedding day. More specifically, making time for posed pictures of the bride and the groom. I am a big advocate for doing a first look session before the ceremony, but I understand that some couples like to follow tradition and not see each other before the wedding. (You can learn more about first looks here).

So this post is more for those couple that aren't interested in a first look. It's harder for them to find time after the ceremony to get pictures taken together. A lot of brides tell me when I first meet them that they'll just get pictures taken together during the group pictures after the ceremony. That's a great idea and it's what I suggest, but if you don't sit aside time for the one-on-one pictures - they won't happen.

This is typically what happens on a wedding day: The bride has been up since 6am doing last minute things and has barely eaten because she's nervous. She just spent anywhere from 20 to 45 minutes standing in front of everyone she knows. Her feet hurt and she's hungry. And now hungry guests are pressuring her to rush through the group pictures so they can eat. A wedding day is magical and wonderful, but it's also stressful and hectic.

So in my first meeting with brides I like to challenge them to commit to putting 15 minutes aside for just the bride and the groom and say no to peer pressure! Take the bridal party shots, the family shots, and then send everyone away for 15 minutes. I know everyone's hungry and I know we all just want to get to the fun part: the drinking and the dancing, but I also know that when you skip the pictures of just the bride and the groom in a close, intimate setting - you'll regret it.

Below is a great example of an amazing couple who made time to take some one-on-one shots after their wedding. Tommy and Jen got married in Newark, Ohio in December (luckily it was a 60 degree December day). After the ceremony we took a five minute car ride to a theater downtown that meant something to them. Then we ducked into an alley nearby for some amazing, posed shots. Tommy and Jen's bridal party was with us but when it came time for Jen and Tommy's moment, I sent them around the corner to hangout so Jen and Tommy could be alone (and more comfortable in front of the lens). There's a reason that prom pictures look so awkward - it's because there's a line of 50 of your peers watching you take them! Go somewhere private for the pictures - you'll thank me.

Bride and Groom Portraits

I'm not just going to harp that you need to take pictures and then leave it to you to figure out how. I do have a few suggestions on how to make time for pictures on your wedding day. The easiest one is to take same sex group pictures before the ceremony. Tommy and Jen did this and it led to some amazing and fun pictures of the guys outside the church before the wedding (there was a jungle gym involved). This made the group pictures after the ceremony go a lot faster. Second, give yourself a buffer between the ceremony and the reception so you know you have time and you're not rushing yourself. A great way to keep your guests happy during that time is by having a cocktail hour. Lastly, make some plans for the bride and groom pictures. Pick out a location (and maybe a back-up just in case)- it can be at the church, at the reception, or somewhere else entirely and let people know ahead of time that you want it to be just a one-on-one thing.

I know I may be a little bias about the important of pictures on a wedding day, but I also know that there are brides out there that feel the same way. So if you're one of those brides, take my advice and make some time to take the pictures you'll want on your walls for the rest of your life!

Keep smiling,
Kaylina

Wednesday, May 16

How to Do Your Make-up for Your Photo Shoot

Let me start out by saying that I am not a professional make-up artist and I can't teach you how to do a "smokey eye" (I've been trying for years). With that being said, Photography is all about capturing you in a way that's real and in a way that you'll want to share. I love my job because I get to make everyone feel special and beautiful. So please don't stress. I promise that your normal routine is perfect, these are just some broad tips about what to do and what not to do if you're feeling a little anxious getting ready for an upcoming photo shoot.

1. Natural is key
I do realize that there are people out there that like to look like the stars of Toddlers and Tiara's but I would recommend that less is more. In preparing for this post I did a little research and found that a lot of places recommend that you do your normal make-up and then cake on even more. I do not recommend that. Because I am a natural lighting photographer, I don't think you need to cake on the make-up because I'm not going to use any studio lights to wash-out your face. So take it easy. Do your hair; do your make-up. But remember that we want to see the real you, so keep it simple.

These ladies did a great job of having beautiful, natural looks for their senior shoots last month.

2. Oil free make-up
While I don't use studio lighting, I do use the sun. So try to use oil free make-up the day of your shoot. The sun has a nasty habit of picking up the shine of the make-up and making our faces look oily. Along that line, don't use sun screen the day of the shoot. Sunscreen actually has something in it that reflects the rays of the sun (that's about as specific as I can get- I'm not a scientist). So leave the SPF at home just for the day. Your oil free face will thank you.

3. Lip gloss not lip balm
This tip actually surprised me a little bit when I first heard it but it's super simple and only needs one sentence of explanation: Lip balm (or chap stick) settles in to the cracks of your lips making those cracks even more noticeable; lip gloss doesn't do that. If you're not sold yet- here's another thing I've noticed but is not proven (because I'm not a scientist)- chap sticks often give lips a purple or white look instead of a nice pretty, pink or red. So if you do need something for your lips that day, bring some lip gloss along.

4. Easy on the sparkles
Speaking of lip gloss... go easy on the sparkles and the glitter and just pick a nice, natural color with just a little bit of shine. The same goes for eyeshadow, blush, bronzer, or any other product you're using that day. Just stay away from glitter and sparkles. Now I'm all for shimmers, I don't even think they make eyeshadow without a little shimmer in it (or at least I don't use any). I'm just saying that some really sparkly lips may distract us from how gorgeous your eyes are. So sparkle responsibly, ladies.

5. Don't skip the basics
Please remember to do the usual stuff. Pluck your eyebrows, cut your nails, paint your toe-nails if that's all part of your normal routine. You may think that we won't see your feet or your hands but you'd be surprised how many of you limbs I can fit in a picture. So just make sure you're well groomed for the day because we want to show off all of you.

6. Don't worry
Please don't cancel your shoot because your face decided to declare war on you the night before and you have a fresh set of pimples. And please don't go out and spend $200 on a teeth whitening treatment. Small blemishes or insecurities you have we can work with. It's incredibly easy to remove those pimples you're worried about and whiten those teeth a little bit. If you really don't like your feet- tell your photographer and we'll try not to showcase them. Photo shoots are times to have fun and let all of your worries and insecurities slip to the background. So just remember to be confident and smile, it's my job to make you look good.

Hope this helped at least one person out there. Please leave comments with your own tips or questions, I'd love to hear them! And Don't forget to like Kaylina Norton Photography on Facebook to stay in the loop!

Keep smiling!
Kaylina


Friday, March 9

Your Guide to the Cutest Baby Pictures

So yes, I've been AWOL the last few weeks. But finals week is next week so the end is in sight. In the spirit of my upcoming Spring break and the urge to go outside and play (no matter what your age), I wanted to hand out some tips about taking great pictures of your children.

1. Don't do it alone

Bring back-up, people! Children, especially babies, need someone or something to direct their attention where you want it. Yes, you can try to coach their eyes toward you verbally or with a shiny, new toy but while you're doing that you're missing some great shots. So make sure you have another person with you who can help wrangle those kids into a shot you want.
This adorable smile is all thanks to Jonas's mommy
who was a big help during the shoot.

2. Don't focus on poses

If you try to pose a child, you're wasting your time. Even if you can get them into the position you want, it will be obvious in the pictures that you coaxed them into it. Let them wiggle, run, or crawl around. Just keep up with them and never stop snapping pictures. Their natural movements, facial expressions, and poses will be 10x cuter than anything you could try to set-up

3. Get on their level

This is a general rule of photography- get on the level of your subject. You want to see the world how your child sees it. So be prepared to squat a lot and maybe even sprawl out on your stomach. The shots you get will totally be worth the grass stains and aching knees.

Laying down beside Miss Aleah got me this wonderful shot
and captured her gorgeous eyes.

4. Be on their time

I have seen a few pictures of crying babies that are beautiful. But they're a rare exception. In real life faces turn tomato red and tears and snot start flowing. I schedule my children's shoots for an hour, but rarely do the kids actually last that long. Play it by ear. If your child starts to get frustrated or fussy back off for 20 minutes and try again if it's appropriate. The great thing about kids is they're cute everyday- you can always try again.

5. Keep them busy

Most children are NOT camera shy. They strike a pose and scream "cheeeeeeeeeeese!" at the sight of a camera. Unfortunately, those pictures aren't the ones you want. So give them something to do. Give older children a craft, activity, or just make up a game to take their minds off the fact you have a camera. This also works for those children that are camera shy.

Giving Miss Melody these puzzle pieces got her to
relax and give me some great, candid expressions.
6. Get creative

If you're taking these pictures with a purpose in mind (greeting cards, calendars, or just wall art) you may want to dress the little one up more than usual. To me there is nothing cuter than an unexpected outfit on a child. Have son dress like just like daddy or put daughter in a pair of mommy's old heels. Give them props to go along with the outfit (maybe a briefcase or a long strand of pearls).

Looking for examples of outfits, props, or just great baby photos? Check out my "Kids and Babies" board on Pinterest. Don't forget to "like" my page on Facebook and follow me on Twitter to stay in the loop. Hopefully this will help at least one person out there. Feel free to leave a comment with your own tips or any questions.

Keep smiling!
Kaylina